Importance of Fit in Climbing Shoes
A proper fit is crucial for optimal performance and comfort. Snug shoes enhance precision and control, while overly tight or loose shoes can hinder climbing ability and cause discomfort.
1.1 Why a Snug Fit Matters
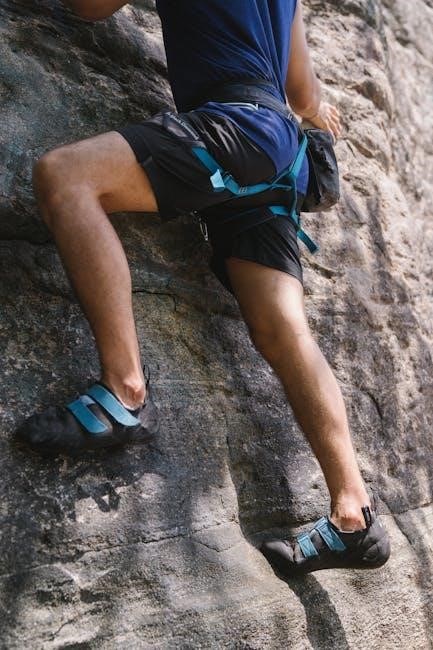
A snug fit is essential for climbing shoes as it provides precision, control, and comfort. Properly fitting shoes allow climbers to feel the rock better, enhancing performance and reducing fatigue. A snug fit prevents slipping and ensures optimal power transfer during moves. It also minimizes discomfort and blisters, enabling climbers to focus on their technique. While some stretching occurs over time, an overly tight fit can hinder circulation and cause pain, making it crucial to balance snugness with comfort for peak climbing efficiency and enjoyment.

1.2 Differences from Regular Shoes
Climbing shoes differ significantly from regular shoes in fit and design. They are typically tighter, with a more precise fit to maximize sensitivity and control. Unlike regular shoes, climbing shoes often require sizing down to ensure a snug fit, as even a little extra space can reduce performance. They also feature specialized materials and constructions, such as downturned toes or stiffer soles, tailored for specific climbing styles and terrains. This distinct design makes climbing shoes more functional for their intended use compared to everyday footwear.
Types of Climbing Shoes
Climbing shoes are categorized into neutral, moderate, and aggressive styles, each designed for specific climbing needs and terrains, varying in fit, flexibility, and support.
2.1 Neutral Climbing Shoes
Neutral climbing shoes are designed for all-around performance, offering a comfortable fit with a relaxed toe box. They are ideal for beginners or those climbing on vertical or low-angled terrain. These shoes provide excellent sensitivity and flexibility, allowing climbers to feel the rock beneath their feet. With a flat or slightly downturned sole, they balance comfort and precision, making them versatile for various climbing styles and terrains.
2.2 Moderate Climbing Shoes

Moderate climbing shoes offer a balance between comfort and performance, making them suitable for a variety of climbing styles and terrains. They feature a slightly downturned sole, providing better edging capabilities on small footholds while maintaining a snug, supportive fit. These shoes are ideal for climbers looking to improve their technique on intermediate routes or those who need more precision than neutral shoes can offer. The moderate design allows for both sensitivity and stability, catering to climbers who want versatility without sacrificing comfort during longer climbs.

2.3 Aggressive Climbing Shoes
Aggressive climbing shoes are designed for advanced climbers tackling steep, technical routes. They feature a highly downturned sole, maximizing power and precision on small footholds. These shoes prioritize performance over comfort, making them ideal for bouldering, lead climbing, or overhanging terrain. The snug, tight fit ensures optimal sensitivity and support, allowing climbers to feel micro-holds and maintain control. While they may require sizing down for the best fit, aggressive shoes deliver unmatched performance for those pushing their limits on challenging climbs.
Factors Influencing Size
Size is influenced by street shoe size, foot shape, and shoe stretch. Climbing shoes often run smaller, requiring a snug fit for performance and control.
3.1 Street Shoe Size vs. Climbing Shoe Size
Climbing shoe sizes often differ from street shoe sizes, as they are designed to be snug. Many climbers size down 0.5 to 2 sizes for the best fit, ensuring precision and support. The tighter fit helps in maintaining control on small footholds and preventing slipping. However, overly tight shoes can cause discomfort. It’s crucial to balance snugness with comfort to avoid pain during prolonged climbs. Proper sizing ensures optimal performance and comfort, making it essential to try shoes on before purchasing.
3.2 How to Determine the Right Fit
Determining the right fit involves balancing snugness and comfort. Try on shoes in the afternoon, as feet swell during the day. Wear thin socks for an accurate fit. Press your toes into the shoe; they should feel snug but not painfully compressed. The heel should feel secure without slipping. Ensure the width matches your foot shape, avoiding pressure points. Avoid overly tight shoes, as they can cause discomfort. Test the fit by standing and walking to assess comfort and support. The goal is to find a fit that enhances performance without sacrificing comfort.
3.3 Understanding Stretch in Climbing Shoes
Climbing shoes can stretch over time, especially those made of leather, which may soften and loosen slightly. Synthetic materials tend to maintain their shape. Knowing how much a shoe will stretch helps in choosing the right size. If a shoe feels too tight initially, it may become more comfortable as it breaks in. Conversely, a shoe that feels too loose may not improve with time. Consider the material and expected stretch when selecting your size to ensure a comfortable and performance-enhancing fit over time.

Terrain and Climbing Style
Different terrains and climbing styles require specific shoe features. Flat shoes excel on vertical routes, while downturned shoes are better for steep or overhanging climbs.
4.1 Choosing Shoes for Different Terrains
For cracks and hand-sized openings, stiff, high-top lace-up shoes like the TC Pro or Butora Altura are ideal. They provide the necessary support and protection for such terrains.
On vertical or low-angled surfaces, flat shoes with a neutral profile are preferred as they offer better smearing and edging capabilities.
For steeper or overhanging routes, more downturned shoes are recommended. Their aggressive shape allows for precise toe placement on small holds, enhancing overall performance and grip on challenging climbs.
4.2 Matching Shoes to Your Climbing Style
Your climbing style significantly influences shoe choice. Neutral shoes are ideal for all-around climbing and beginners, offering comfort and versatility.
For technical routes requiring precision edging, moderate shoes with a slight downturn provide the perfect balance of support and sensitivity.
Aggressive shoes, with their pronounced downturn and thinner rubber, are best for advanced climbers tackling steep overhangs or boulder problems.
Understanding your climbing style helps narrow down the options, ensuring the right fit and performance for your specific needs.

Assessing the Fit
Assessing fit involves checking the toebox, heel, and width. Snugness without pain ensures optimal performance and comfort during climbs.
5.1 Toebox Fit
A proper toebox fit ensures all toes are snug at the end with no dead space. This allows precise control and prevents discomfort or blisters during climbs.
5.2 Heel Fit
A snug heel fit is essential for secure performance. The heel should feel firm but not painful, preventing unwanted movement during climbs. Proper heel fit enhances control and comfort, allowing climbers to focus on their technique. A well-fitting heel reduces the risk of blisters and ensures stability on various terrains. Climbers should prioritize a heel that feels secure yet comfortable, as this directly impacts overall climbing performance and satisfaction. Different climbing styles or terrains may require varying levels of heel tightness, so testing shoes on the intended surface is recommended for optimal fit.

5.3 Width and Comfort
The width of climbing shoes significantly impacts comfort and performance. A shoe that is too narrow can cause discomfort and restrict toe movement, while excessive width may reduce precision. Proper width ensures even pressure distribution, preventing hotspots and enhancing overall comfort during climbs. Climbers should opt for shoes that accommodate their foot shape without sacrificing support. Comfort is key for prolonged climbing sessions, so prioritizing the right width ensures better focus and endurance on the climbing surface, whether it’s a vertical wall or an overhang.

Tips for Choosing the Right Size
Try shoes later in the day, as feet swell. Wear thin socks and ensure snugness without pain. Consider stretch and break-in periods for optimal fit.
6.1 Trying Them On
When trying on climbing shoes, do so in the afternoon, as feet tend to swell throughout the day. Wear the same type of socks you plan to climb in, preferably thin ones to ensure a precise fit. Stand up and wiggle your toes slightly; they should reach the end of the toebox without curling or feeling cramped. The heel should feel secure and snug, with no slipping. Walk around to assess comfort and support. If possible, mimic climbing movements to gauge how the shoes perform under pressure. Remember, climbing shoes should feel snug but not painfully tight, as this can cause discomfort during extended climbs. Pay attention to any pressure points or hotspots, as these can lead to blisters or discomfort. If trying on multiple sizes, compare how each feels during movement. Ultimately, the right fit will balance snugness and comfort, allowing you to focus on your climbing performance without distractions.
6.2 Considering Stretch and Break-In
Climbing shoes, especially those made of leather, will stretch over time. This natural break-in period means a snug fit initially will become more comfortable without losing performance. Synthetic materials stretch less, so consider this when choosing. A common mistake is sizing up too much, as shoes will loosen slightly. Opt for a fit that feels tight but not painful, as it will mold to your feet with use. Proper break-in ensures a balance between support and comfort, allowing you to climb without distractions. Be patient, as the break-in period varies by material and brand.